#5 The Art of Code Documentation: My Approach to Writing Maintainable Code

I used to be one of those guys who dived right into coding, crafting a masterpiece without any regard for documenting it for my future self. Then, when that future self finally remembered the brilliant piece of code I had written, I’d find myself wondering—how the hell do I actually use this? With a gazillion different options packed into it, my own work started feeling like a puzzle.
Sure, I always had some level of documentation, mostly in the form of inline comments in the code itself. But those don’t give you the big picture, nor do they dive deep enough into why a particular code block even exists.
For ACED BI, I knew I had to change the game, given the massive scale of the project. So, I dedicated an entire day solely to choosing the right documentation tool. With dozens of options out there—ranging from project management software to note-taking apps—finding the perfect fit wasn’t easy.
In the end, I landed on Notion. While it’s missing some key features I would have loved—mainly conditional math and automation—the ability to create nested database tables made it the clear winner.
In this post, I’ll walk through my approach to code documentation, how I structure my codebase tracker, and why this system helps me stay efficient. Then, I’ll take a detailed look at one of my modules to show how this documentation translates into real-world usability.
Codebase Overview
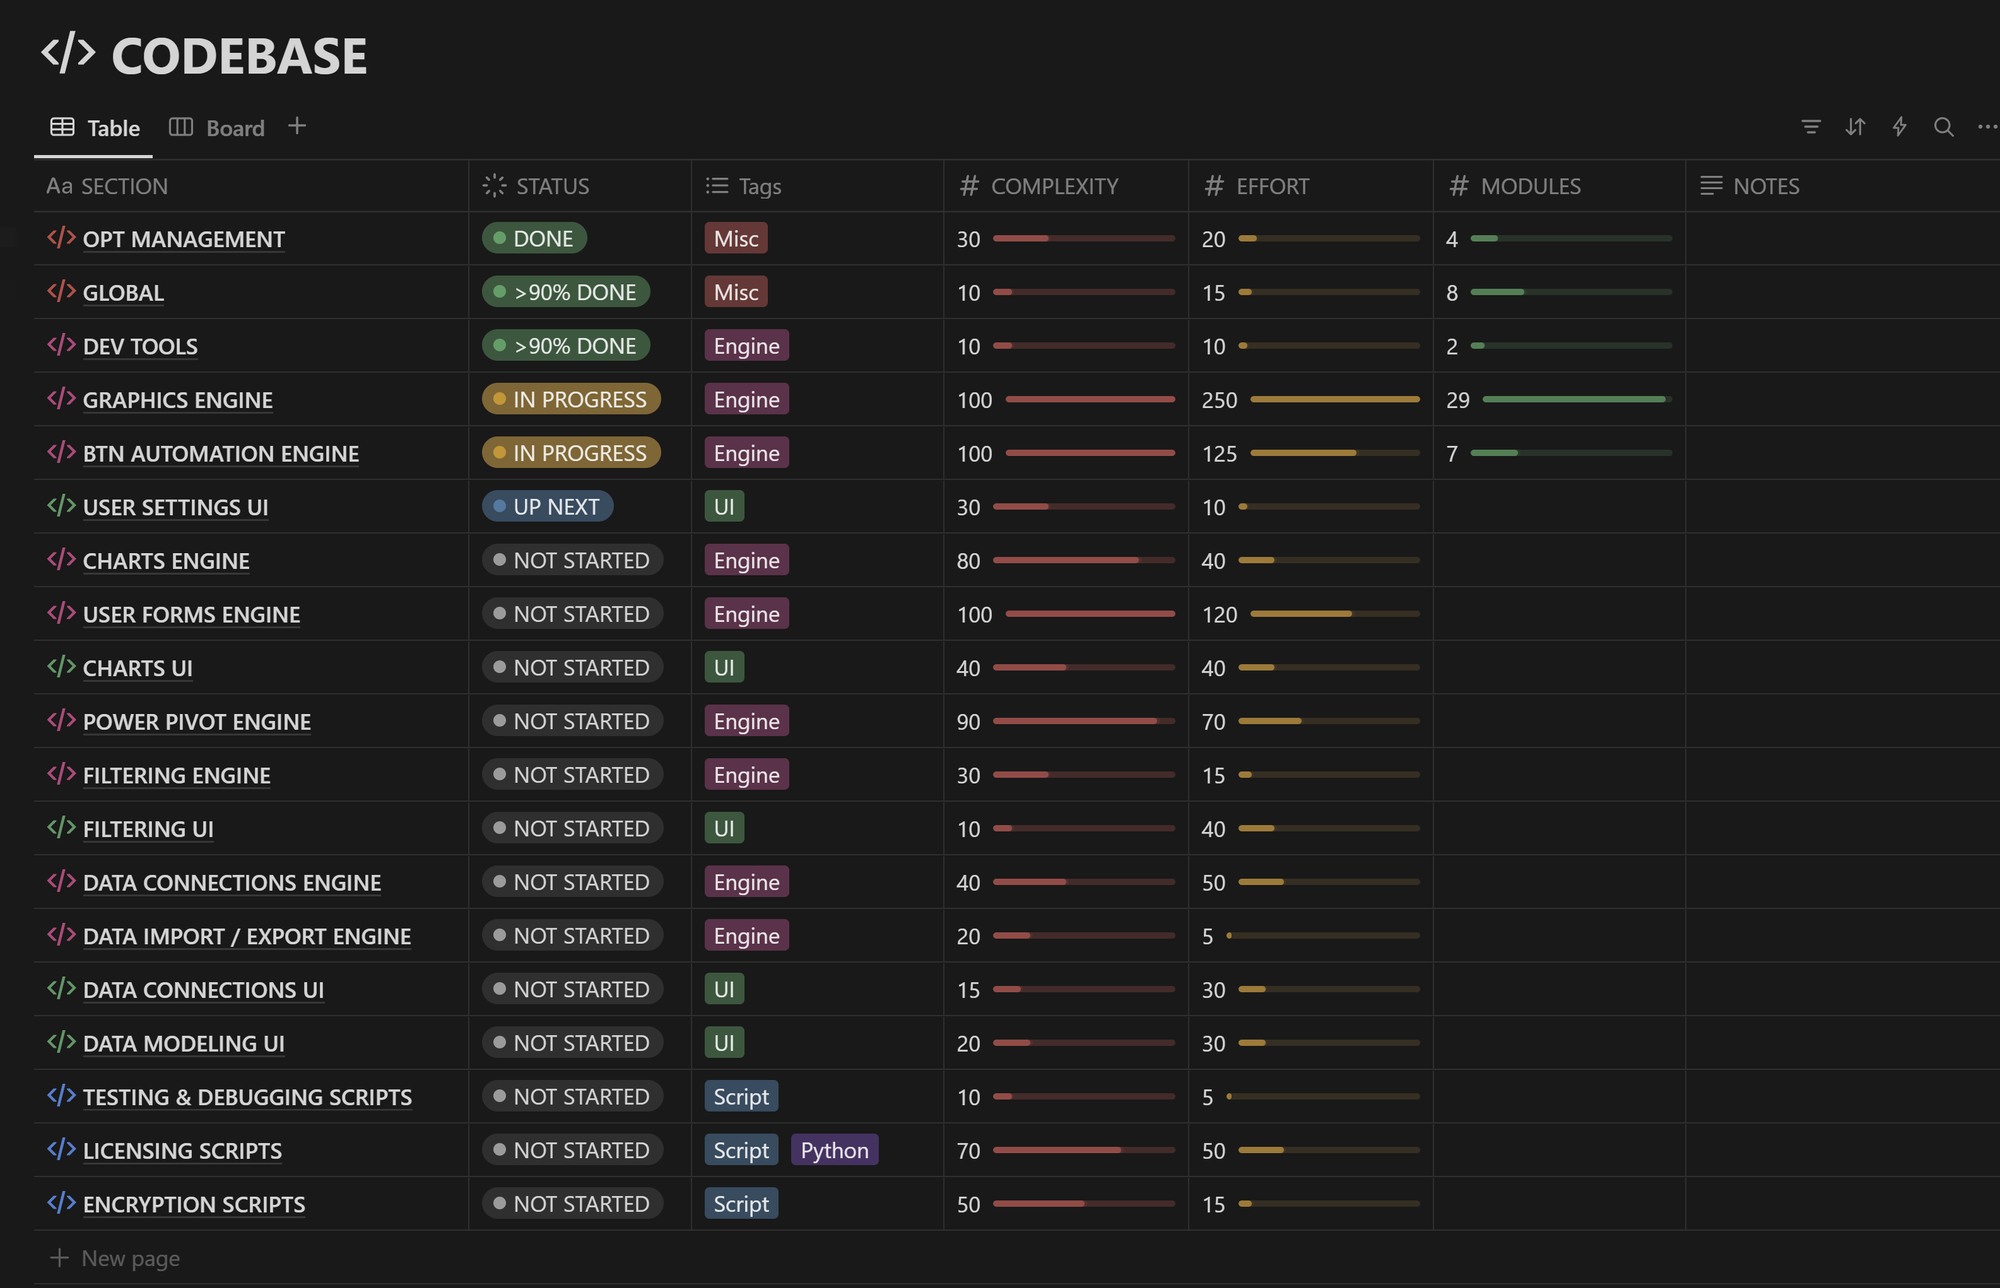
In this Codebase Overview, I get a high-level view of where the project stands at any given moment. It lists all the key components (Sections) that make up the entire application—everything from the Graphics Engine to Encryption Scripts.
This database helps me keep track of all major components, their complexity, estimated effort, and progress status.
The table is divided into several key columns:
- Section – The high-level category (e.g., Graphics Engine, Data Connections).
- Status – The current progress of that section (e.g., Done, In Progress, Not Started).
- Tags – A quick classification (e.g., Engine, UI, Script).
- Complexity – A rough estimate of how difficult the section is to implement.
- Effort – How much time and work will be required.
- Modules – The number of Modules or components within that section.
- Notes – A space for any additional thoughts or considerations.
By structuring the codebase like this, I can prioritize tasks, identify bottlenecks, and make sure no part of the project gets overlooked.
But the biggest advantage of this system is how it organizes my actual code documentation. Clicking on any Section opens a nested database, listing all the individual Modules within that section. This makes it easy to drill down into specific components while keeping everything structured and manageable.
Breaking Down a Section: Understanding Its Modules
For any of my non-VBA readers, a Module is essentially a container that holds related functions, subroutines, and variables. If you're familiar with Python, you can think of a Module as being similar to a single .py file—it groups together related pieces of code.
In my Notion documentation, each Section (like "Graphics Engine" or "Data Connections") contains multiple Modules, each dedicated to a specific piece of functionality.
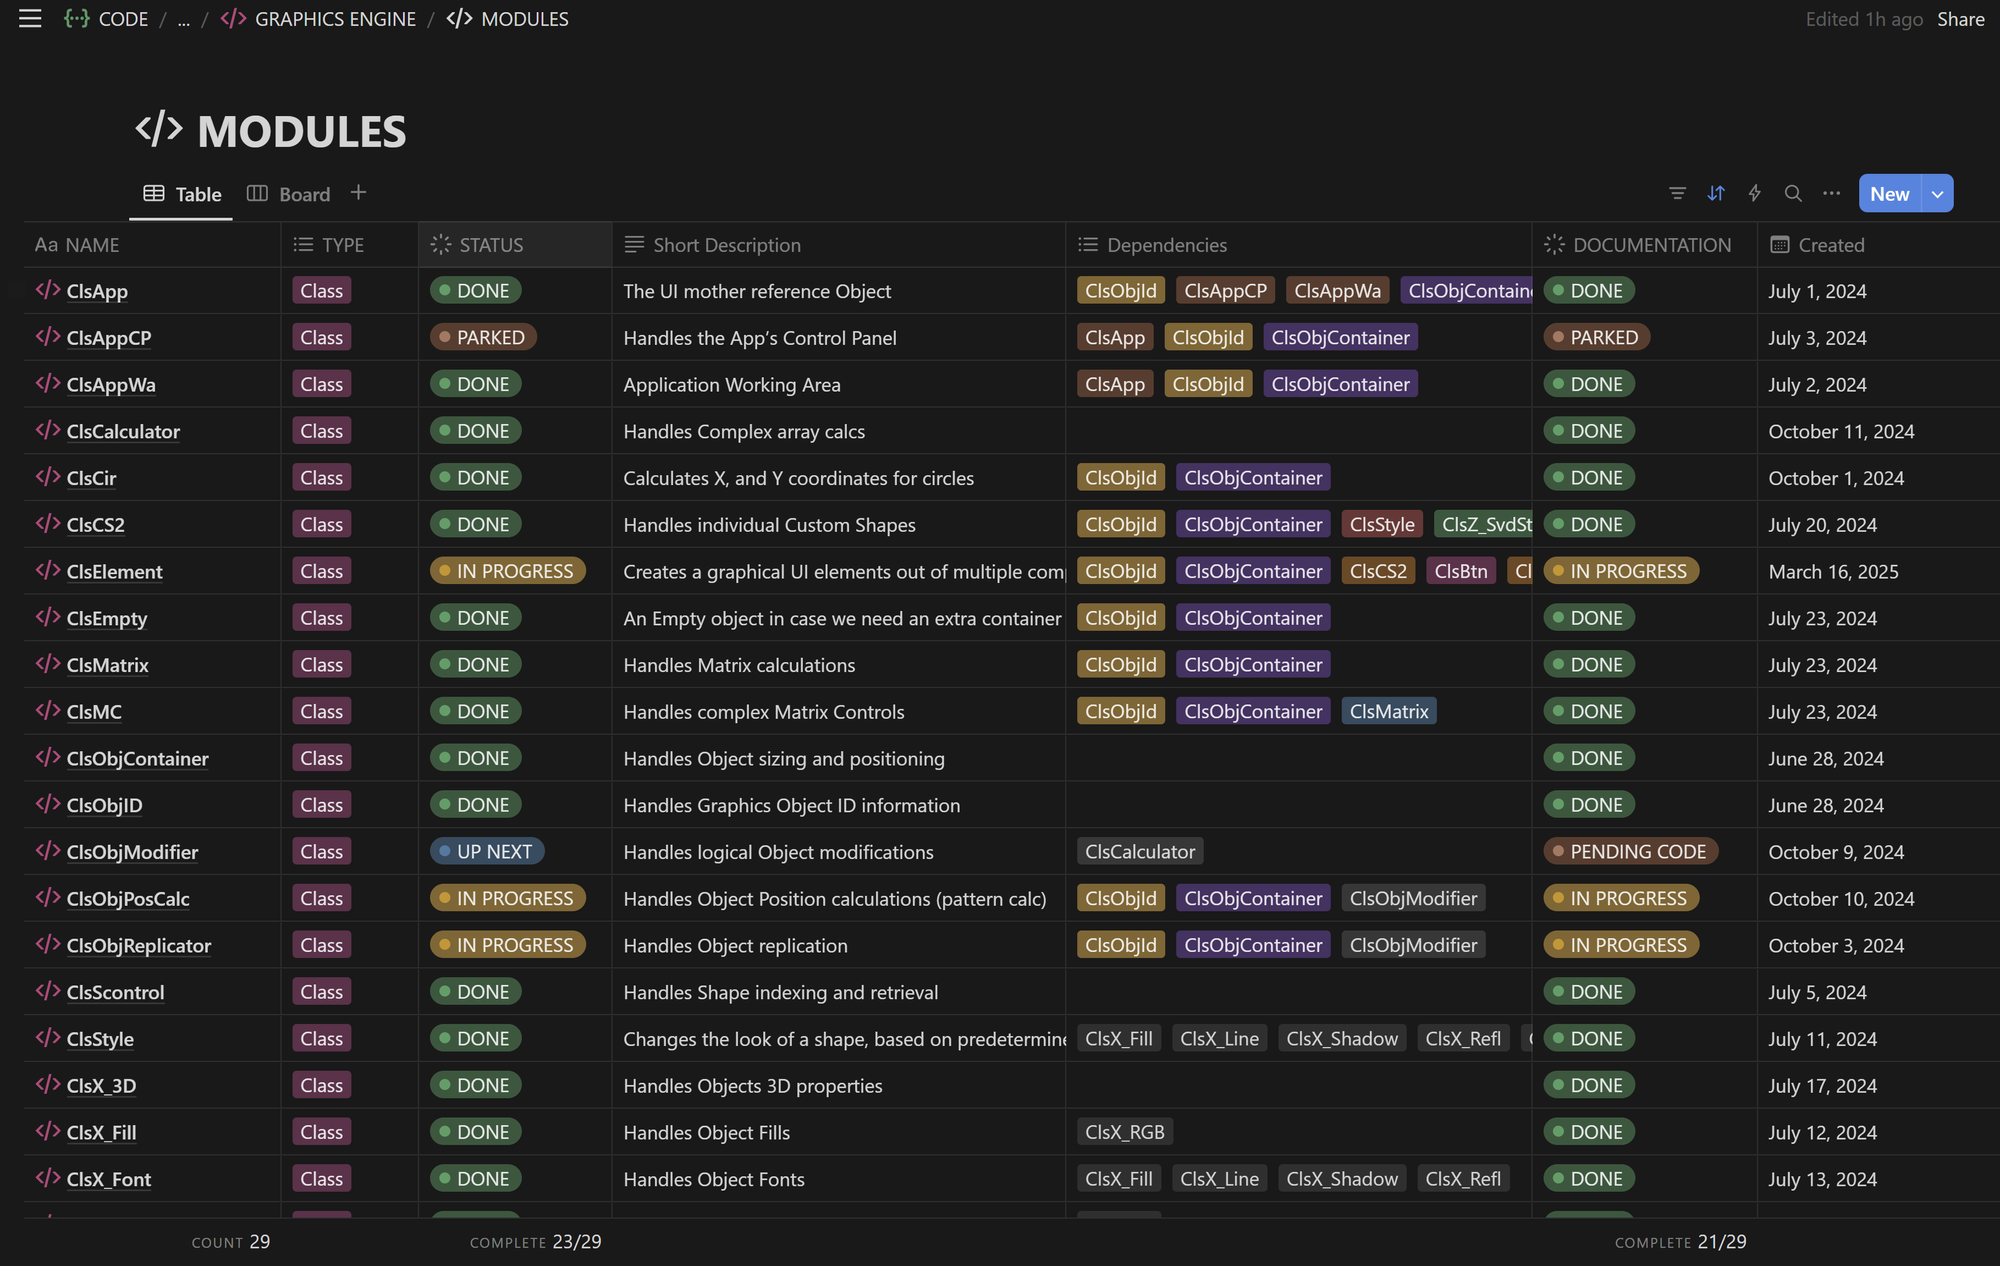
This is where the real code organization happens. Instead of having a scattered mess of files, every Module is clearly defined with its status, dependencies, and documentation progress.
Each row in this table represents a Module, and each column provides critical metadata about its role in the project. Here’s what each column means:
- Name – The module’s name. I use a
Clsprefix for Class Modules. - Type – We can have either Modules, Class Modules or Functions.
- Status – The development progress of the module (e.g., Done, In Progress, Parked, Up Next).
- Short Description – A brief explanation of what the module does. This makes it easy to understand the purpose of each module at a glance.
- Dependencies – Lists other modules that this module relies on to function properly. This is critical for debugging and structuring the codebase.
- Documentation – Whether the module’s documentation is complete. I mark this separately because having working code is not enough—it needs to be fully documented.
- Created – The date the module was added to the project. This helps track development history.
- Last Updated - The date the module was updated.
By structuring my Modules this way, I ensure that every component is well-documented, properly categorized, and easy to manage.
Deep Dive: How I Document a Module
Before I write a single line of code for a new Module, I always start with Notion, outlining at least a broad-strokes plan. In most cases, I end up writing 60-80% of the documentation before even opening the code editor.
This upfront work is actually the hardest part—especially for Class Modules, which makes up the bulk of my work in the first 12 months of this project. Writing the code itself is easy. But knowing what to write and ensuring it seamlessly integrates into the existing codebase requires serious planning.
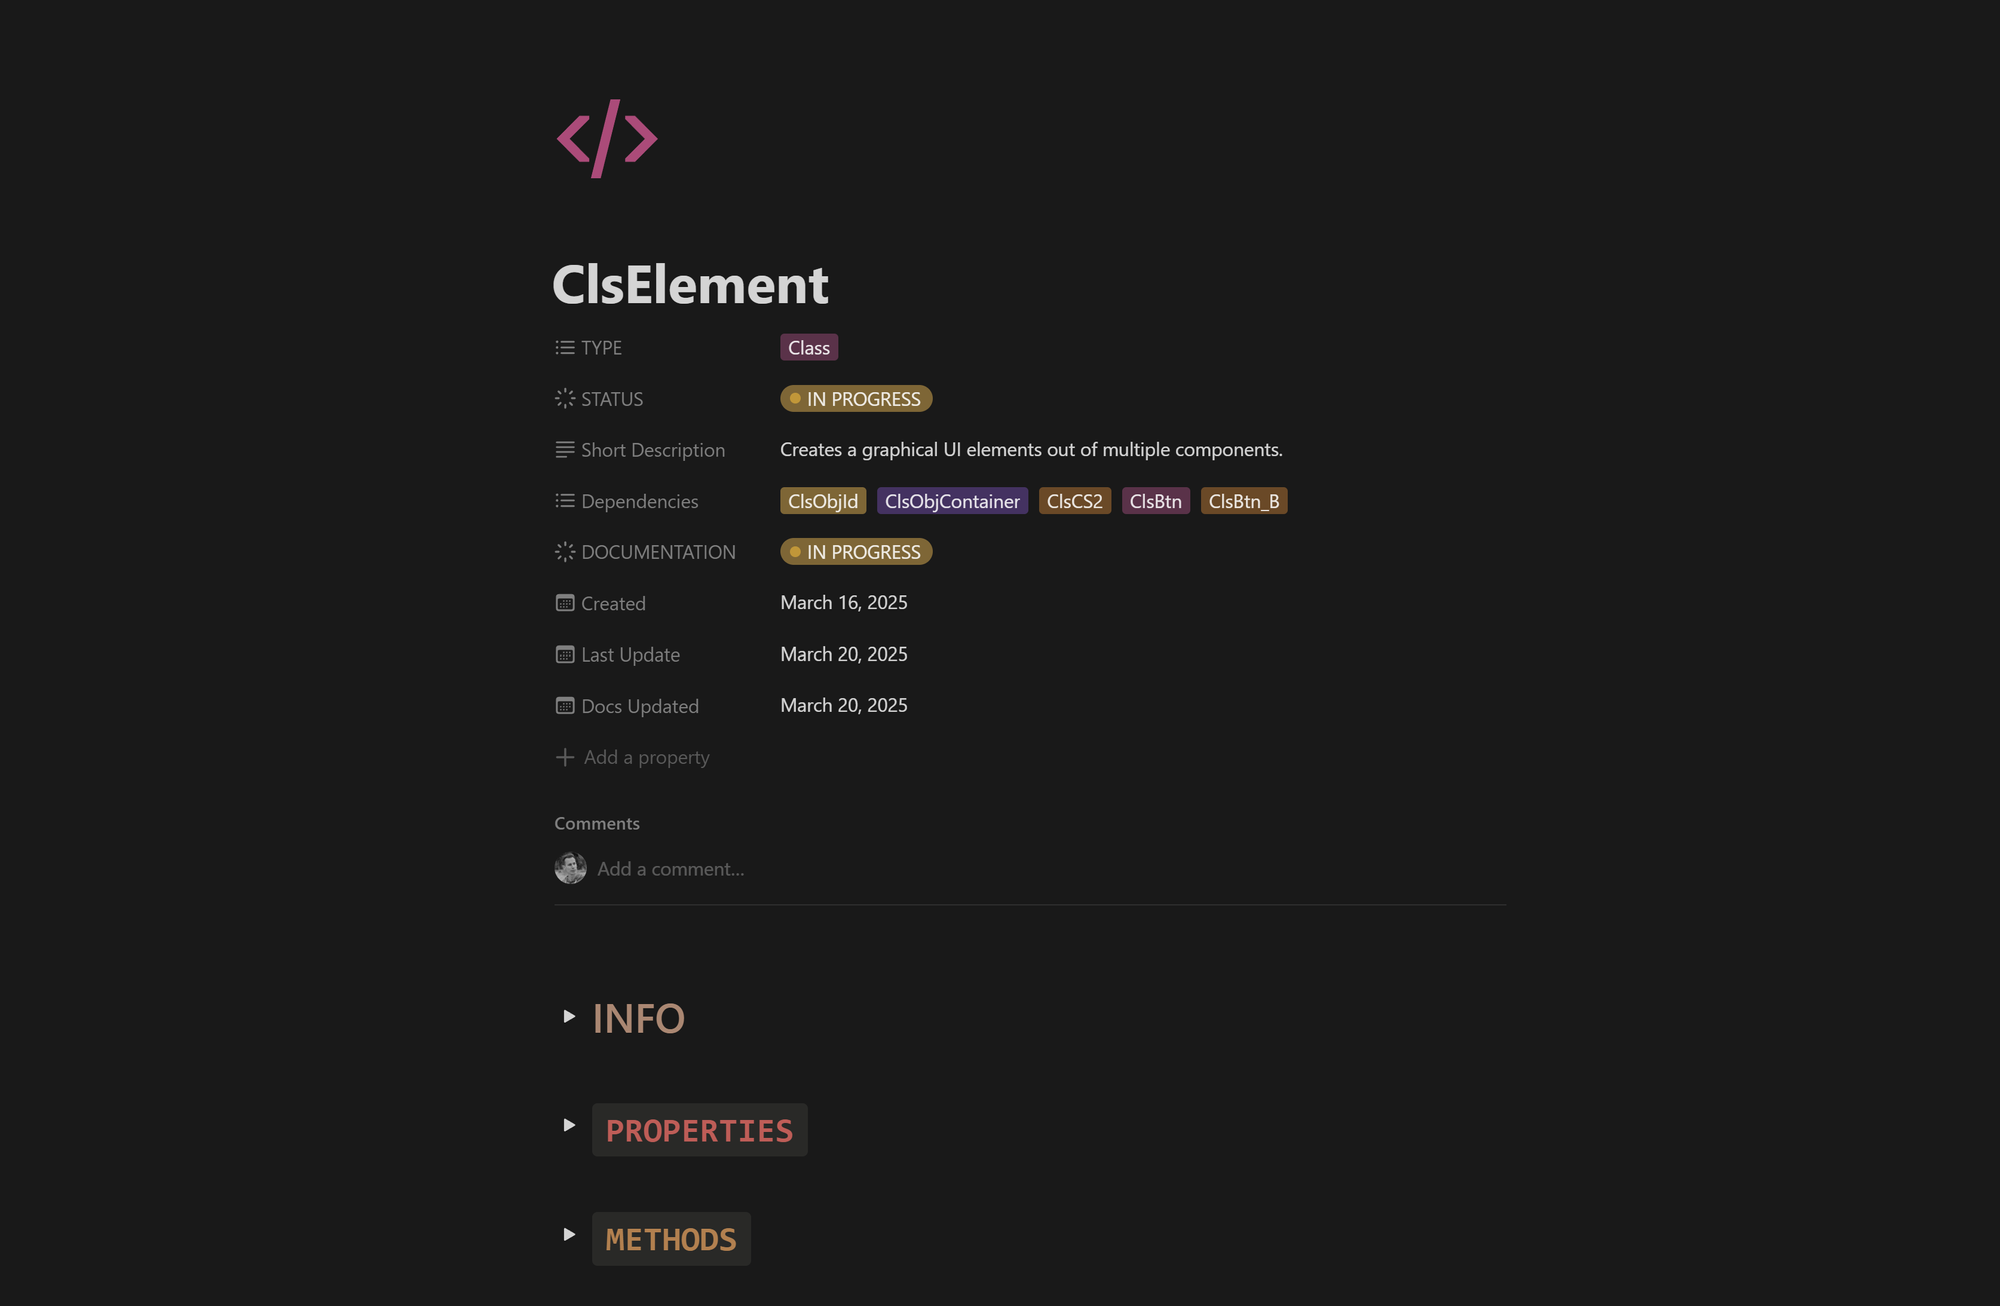
As a case study, I’ve chosen one of my Graphics Engine Modules: ClsElement, to showcase this process.
ClsElement: A Case Study in Documentation
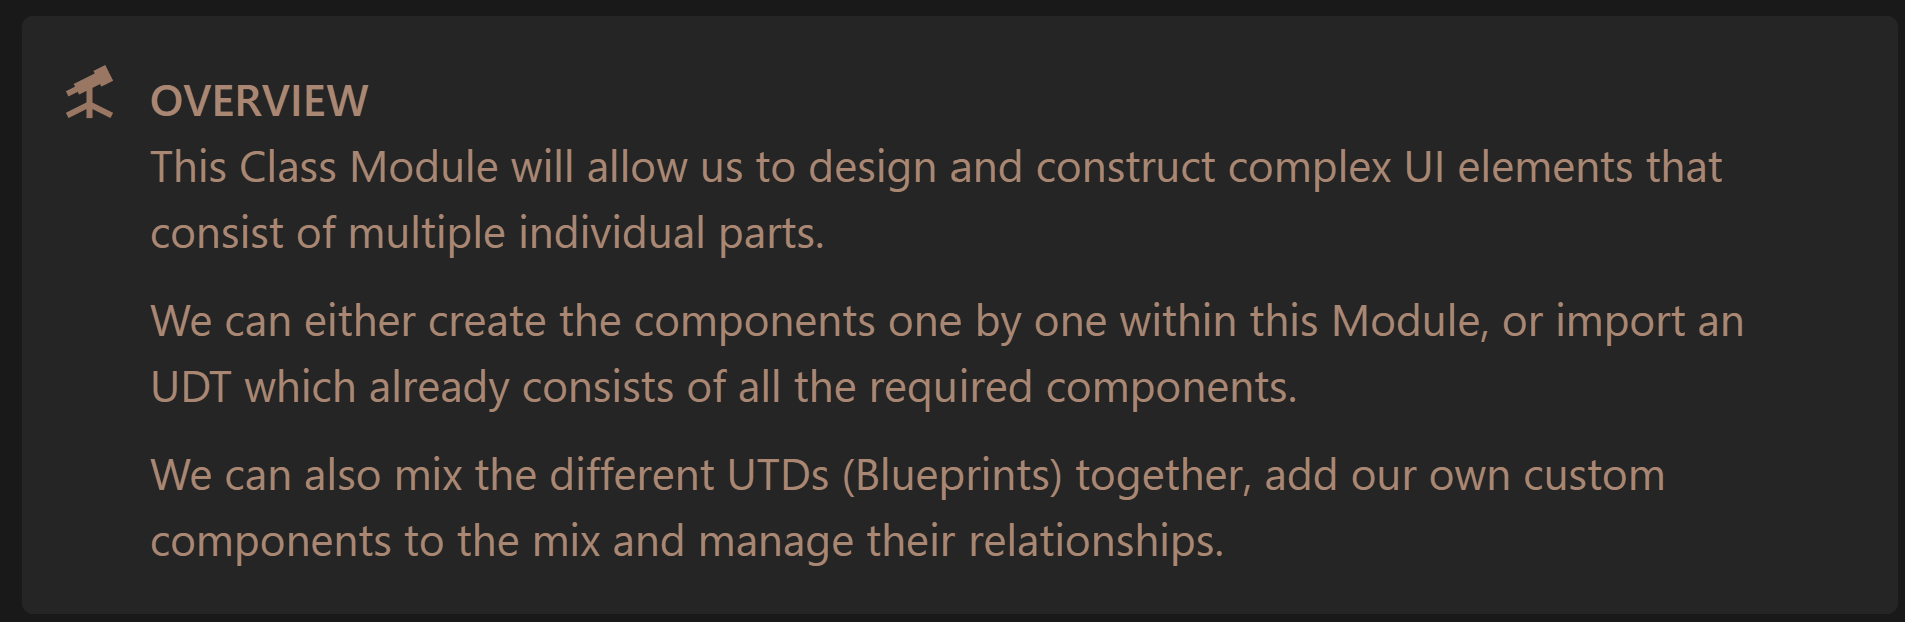
The ClsElement module is a fundamental part of my Graphics Engine, responsible for assembling graphical UI elements from multiple components.
My documentation for ClsElement, and all the other Class Modules, is divided into three main sections:
- Info – Here I outline all key aspects of the Module in as much detail as possible.
- Properties – Lists all internal variables that store the module's state.
- Methods – Documents all public subroutines, detailing what they do and what purpose do they serve.
Overview
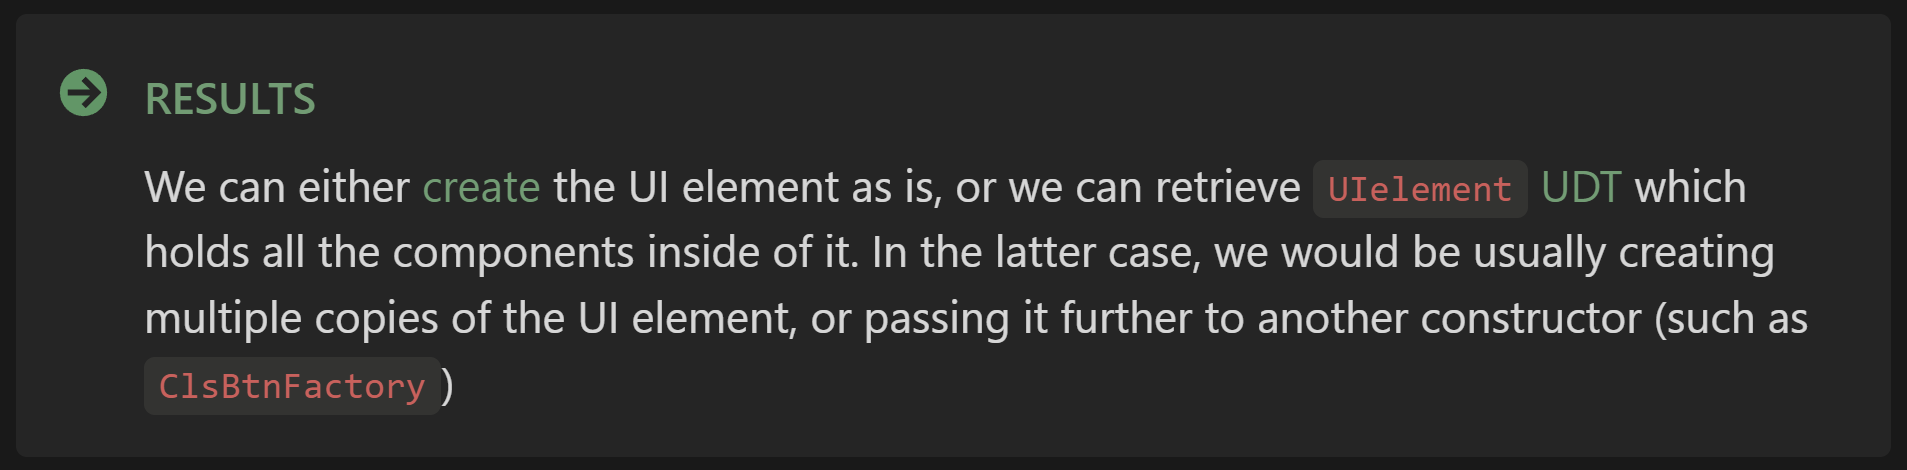
Results
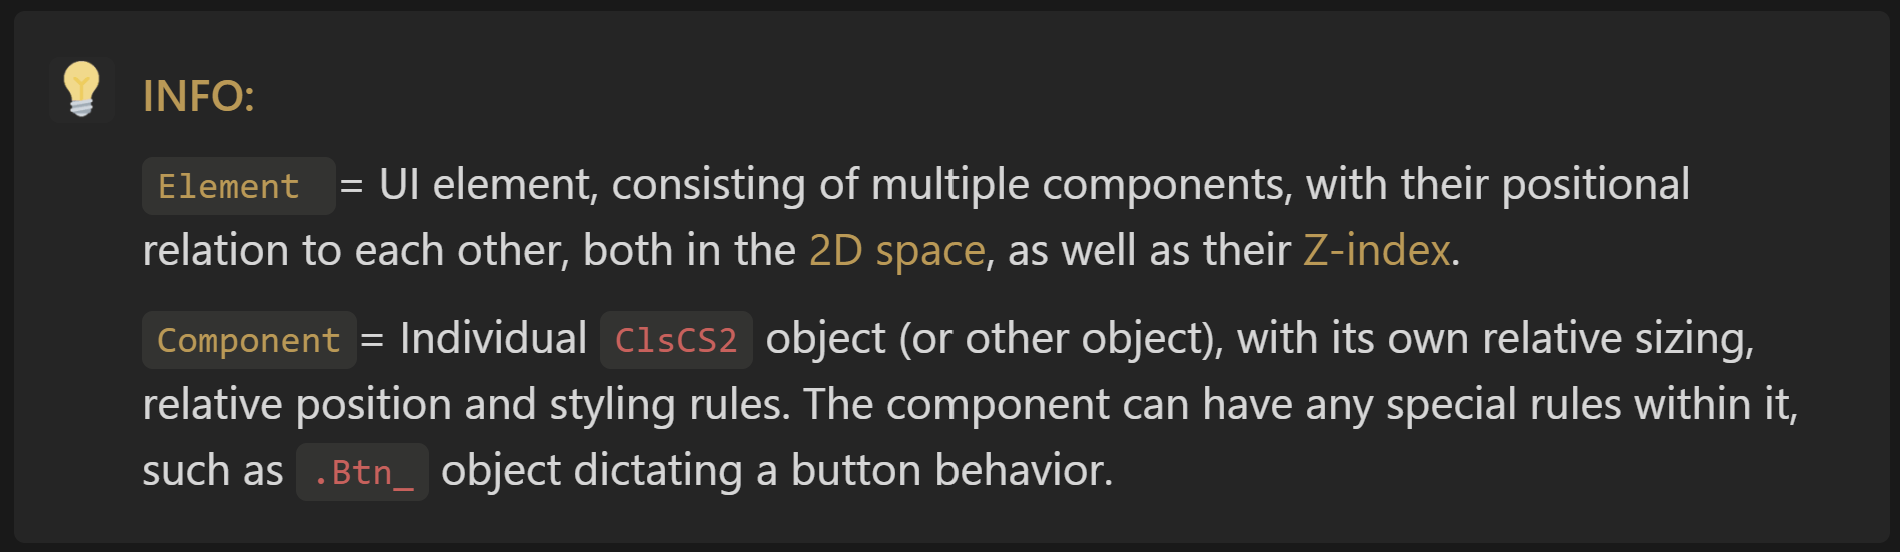
Specific Info
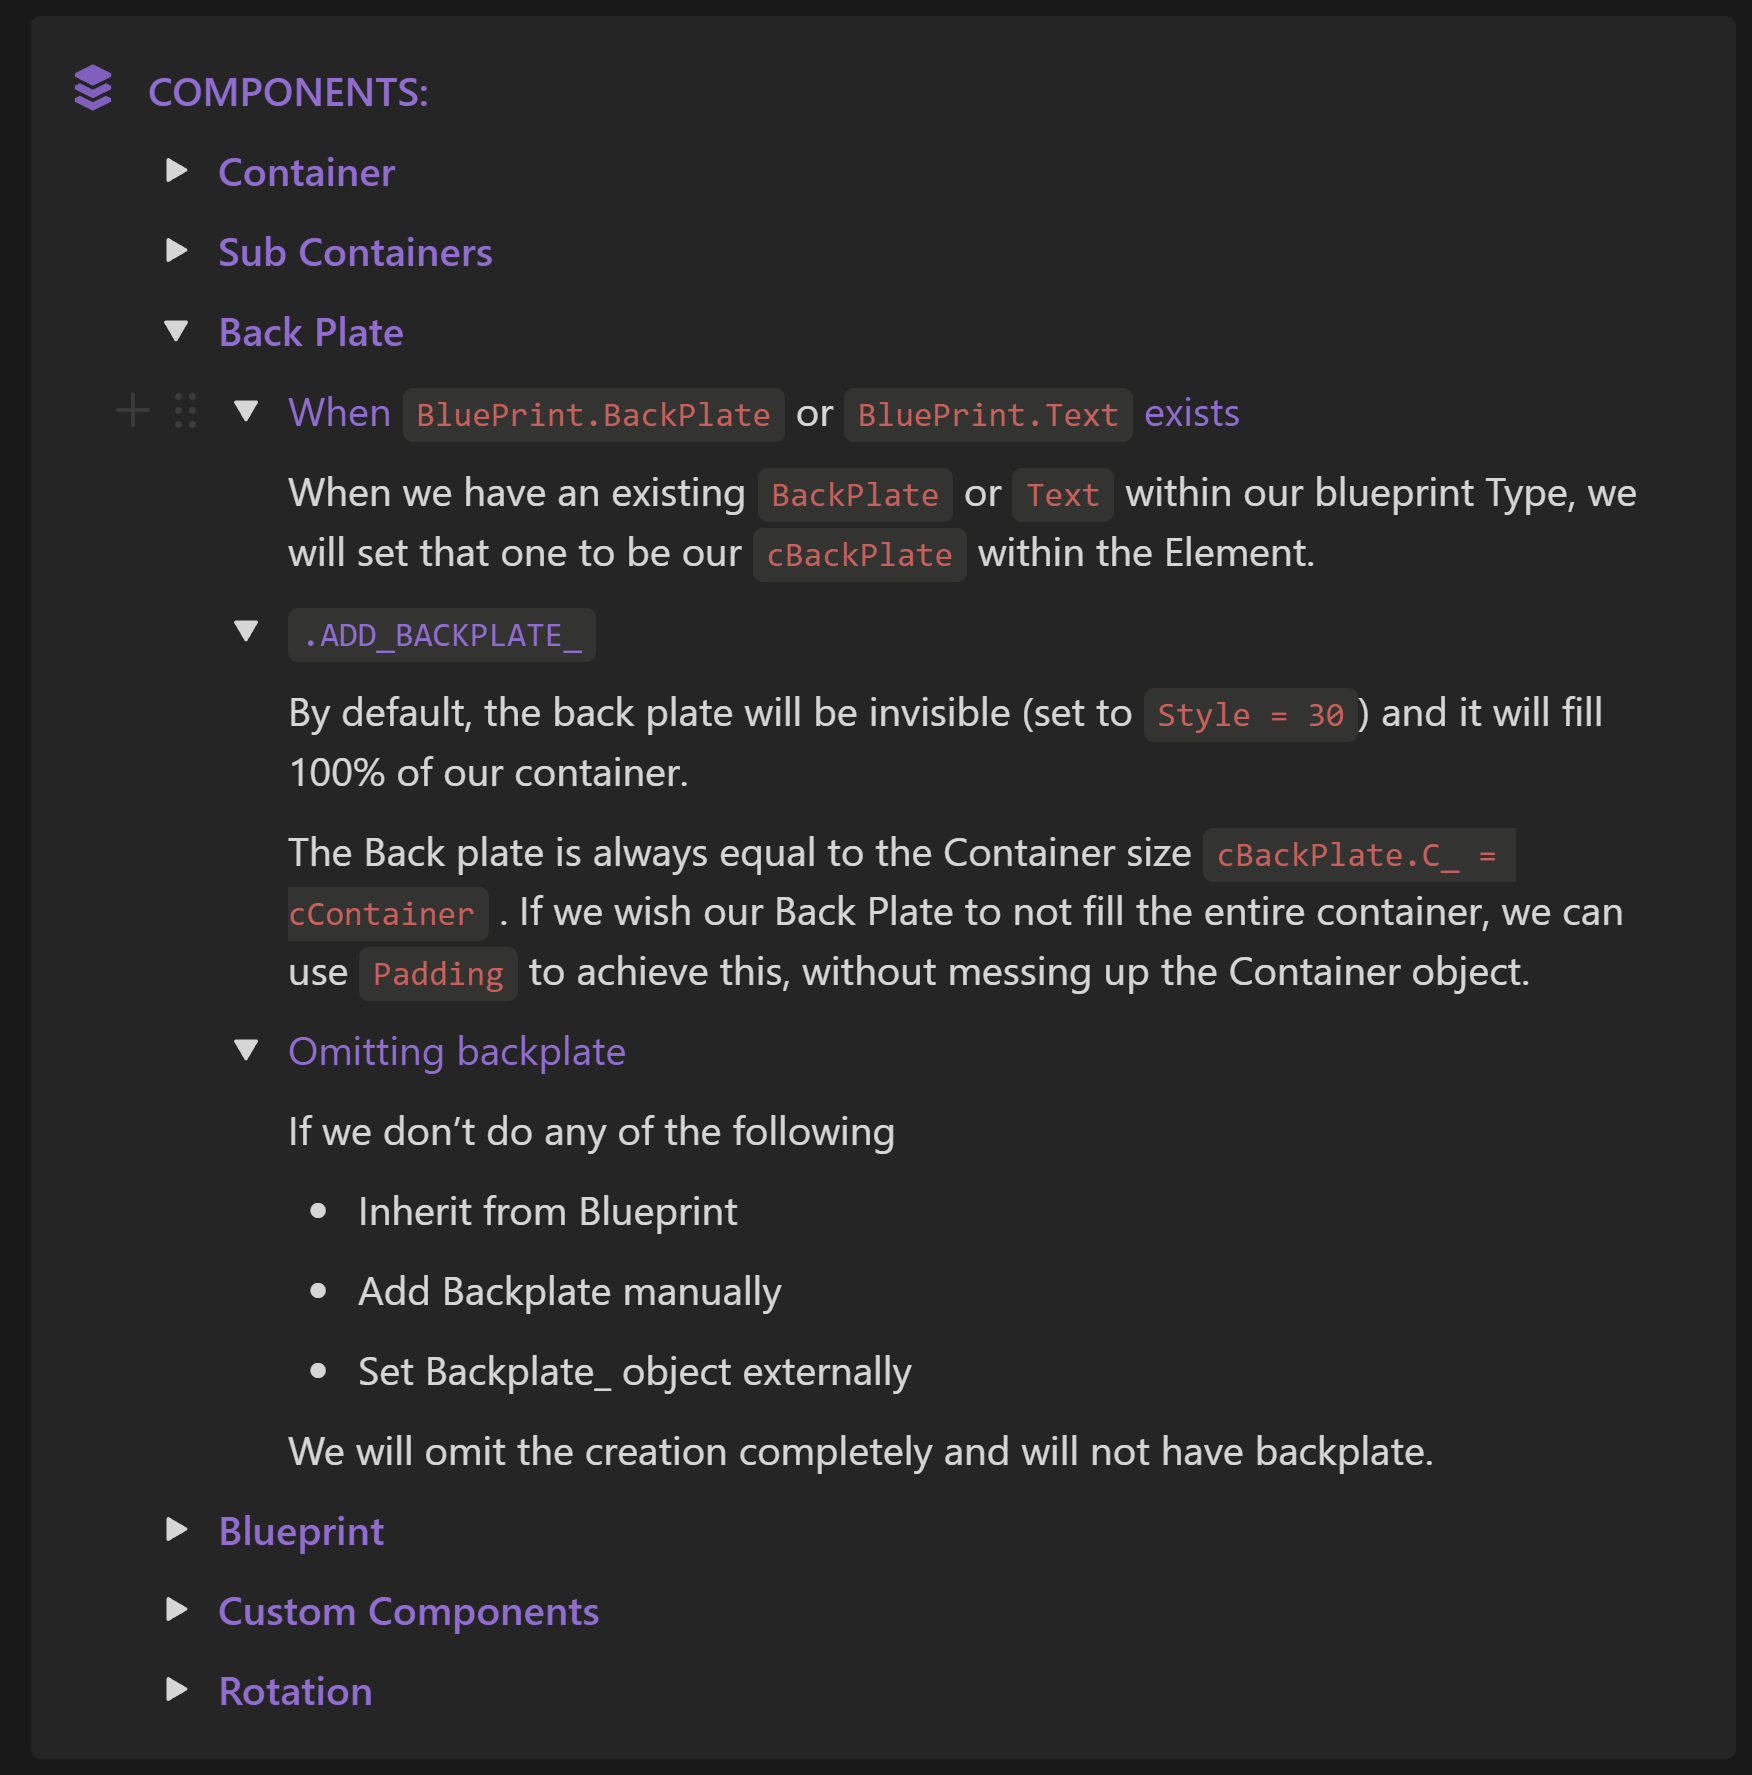
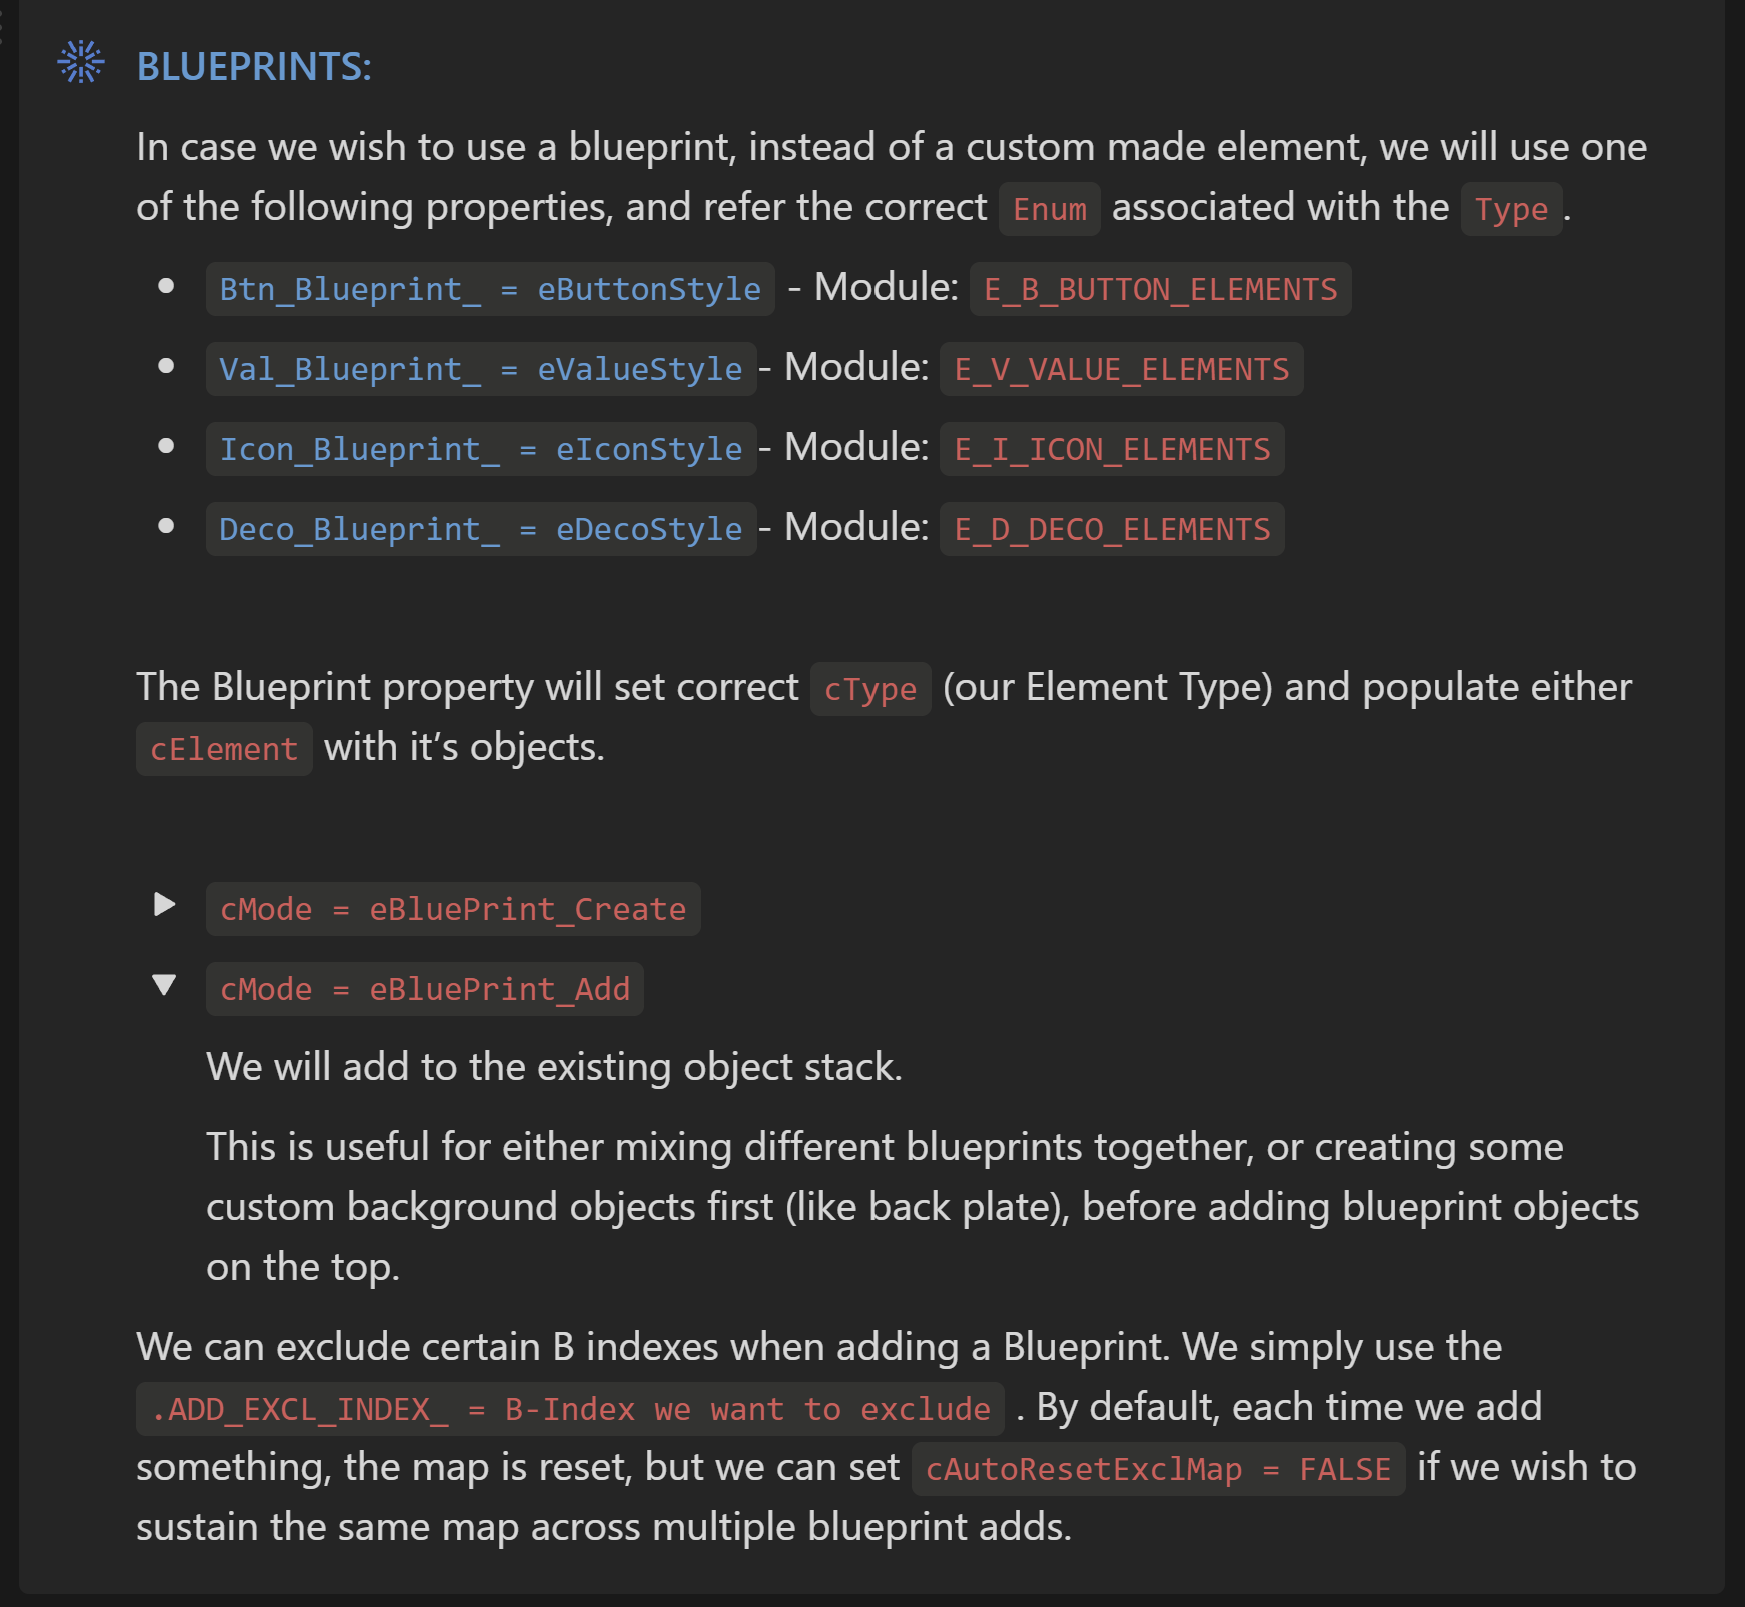
Components
Deep dives
All the sections above can be found in each of my Class Module documentation. However, there is often need to dive deeper and assess a specific component or rule in detail.
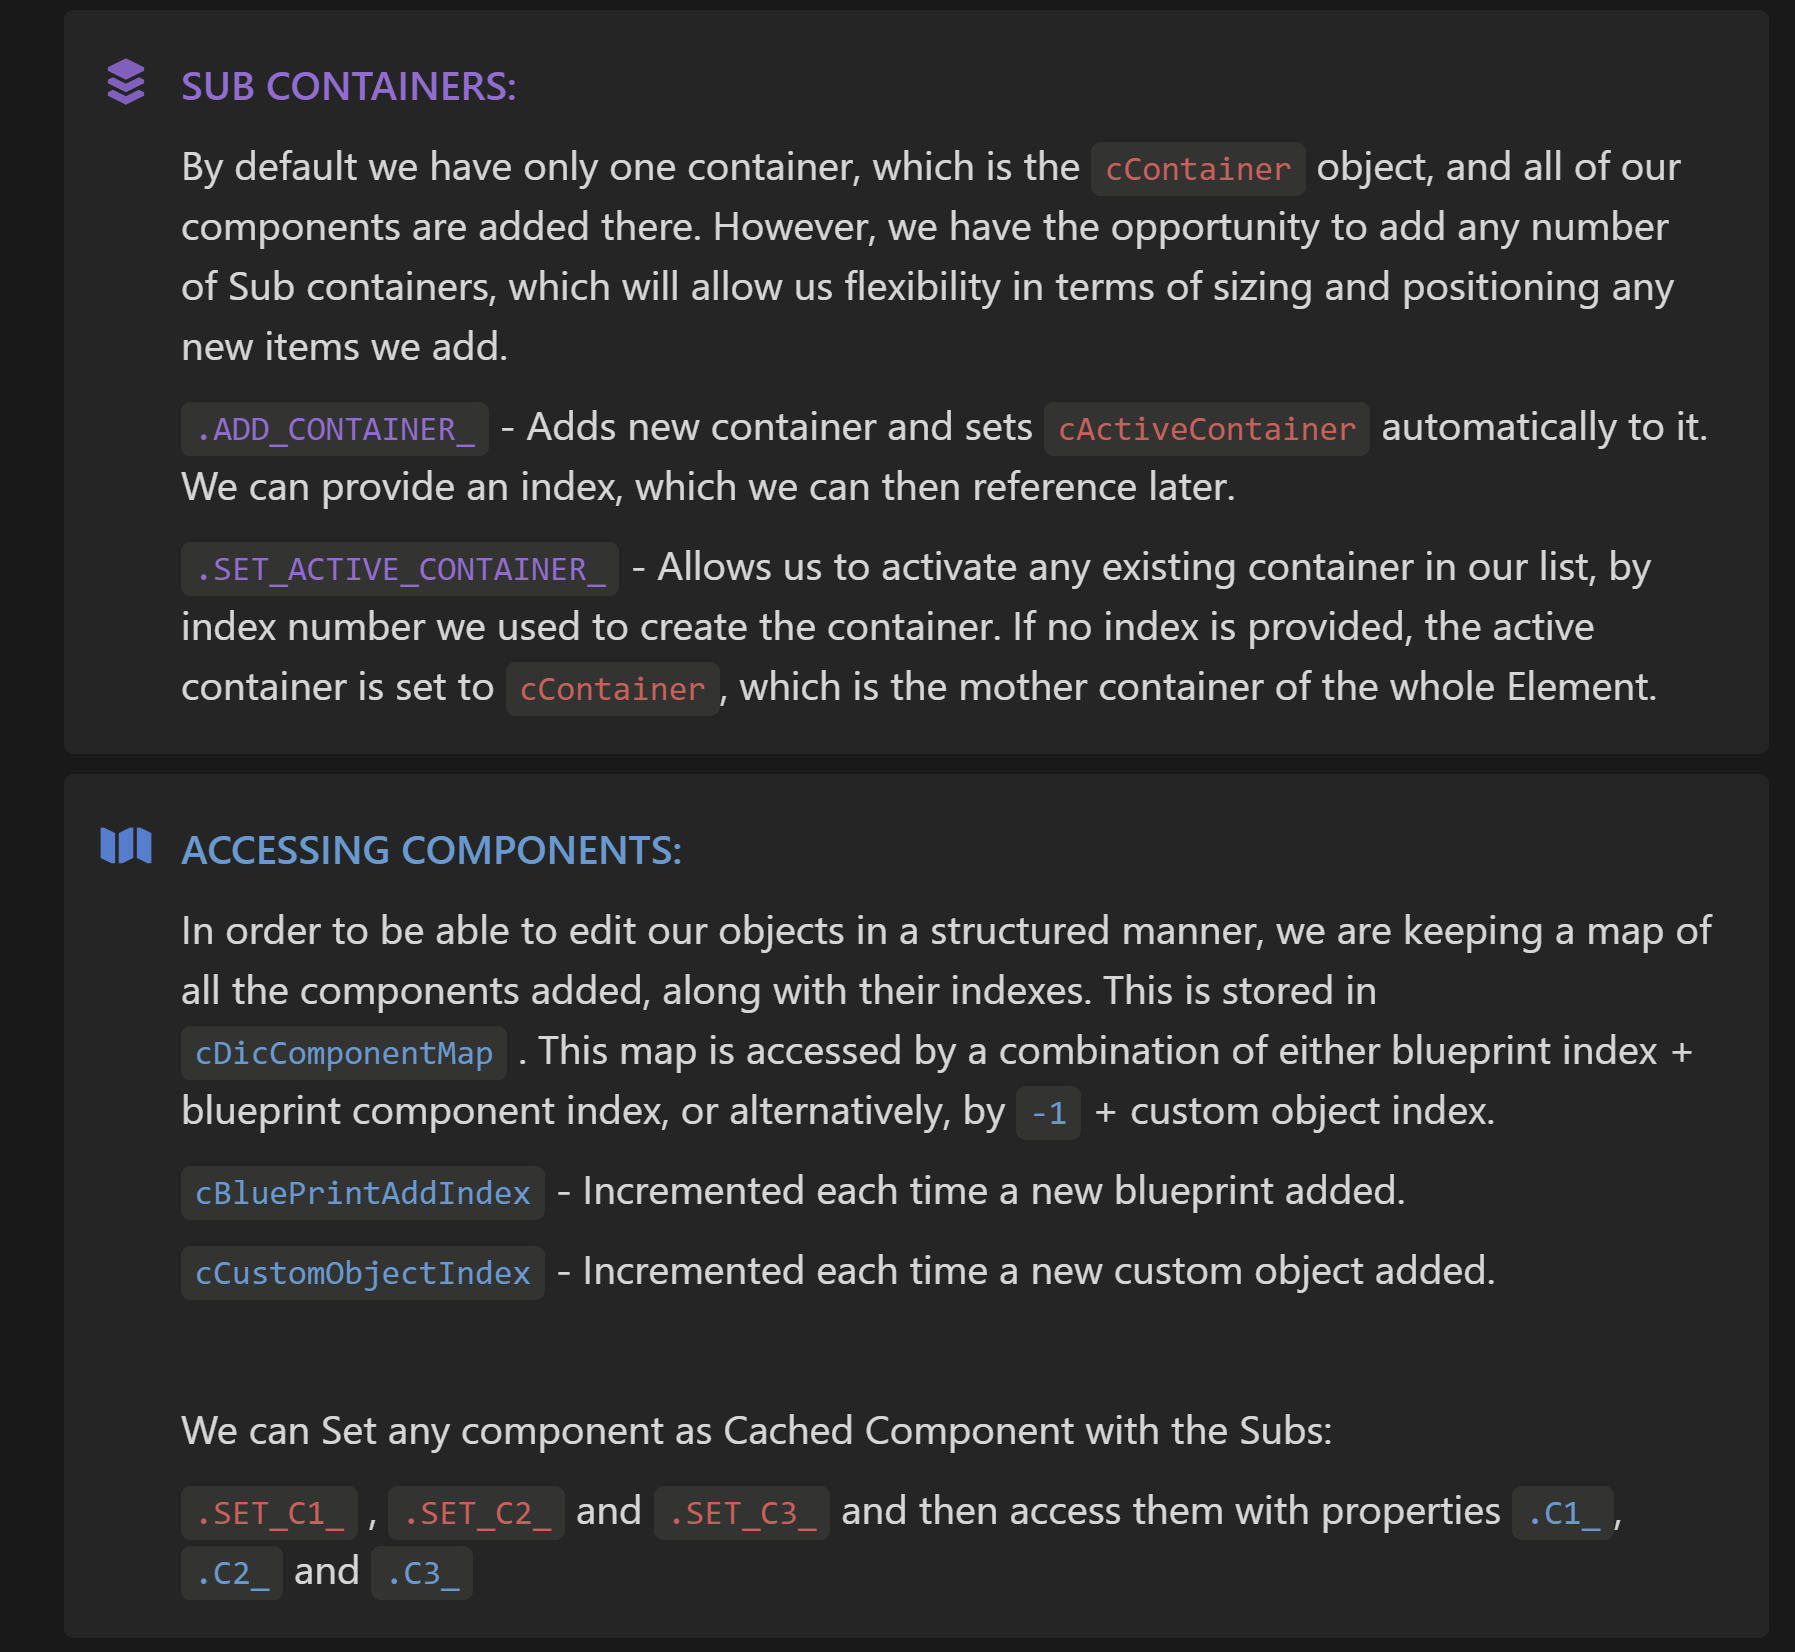
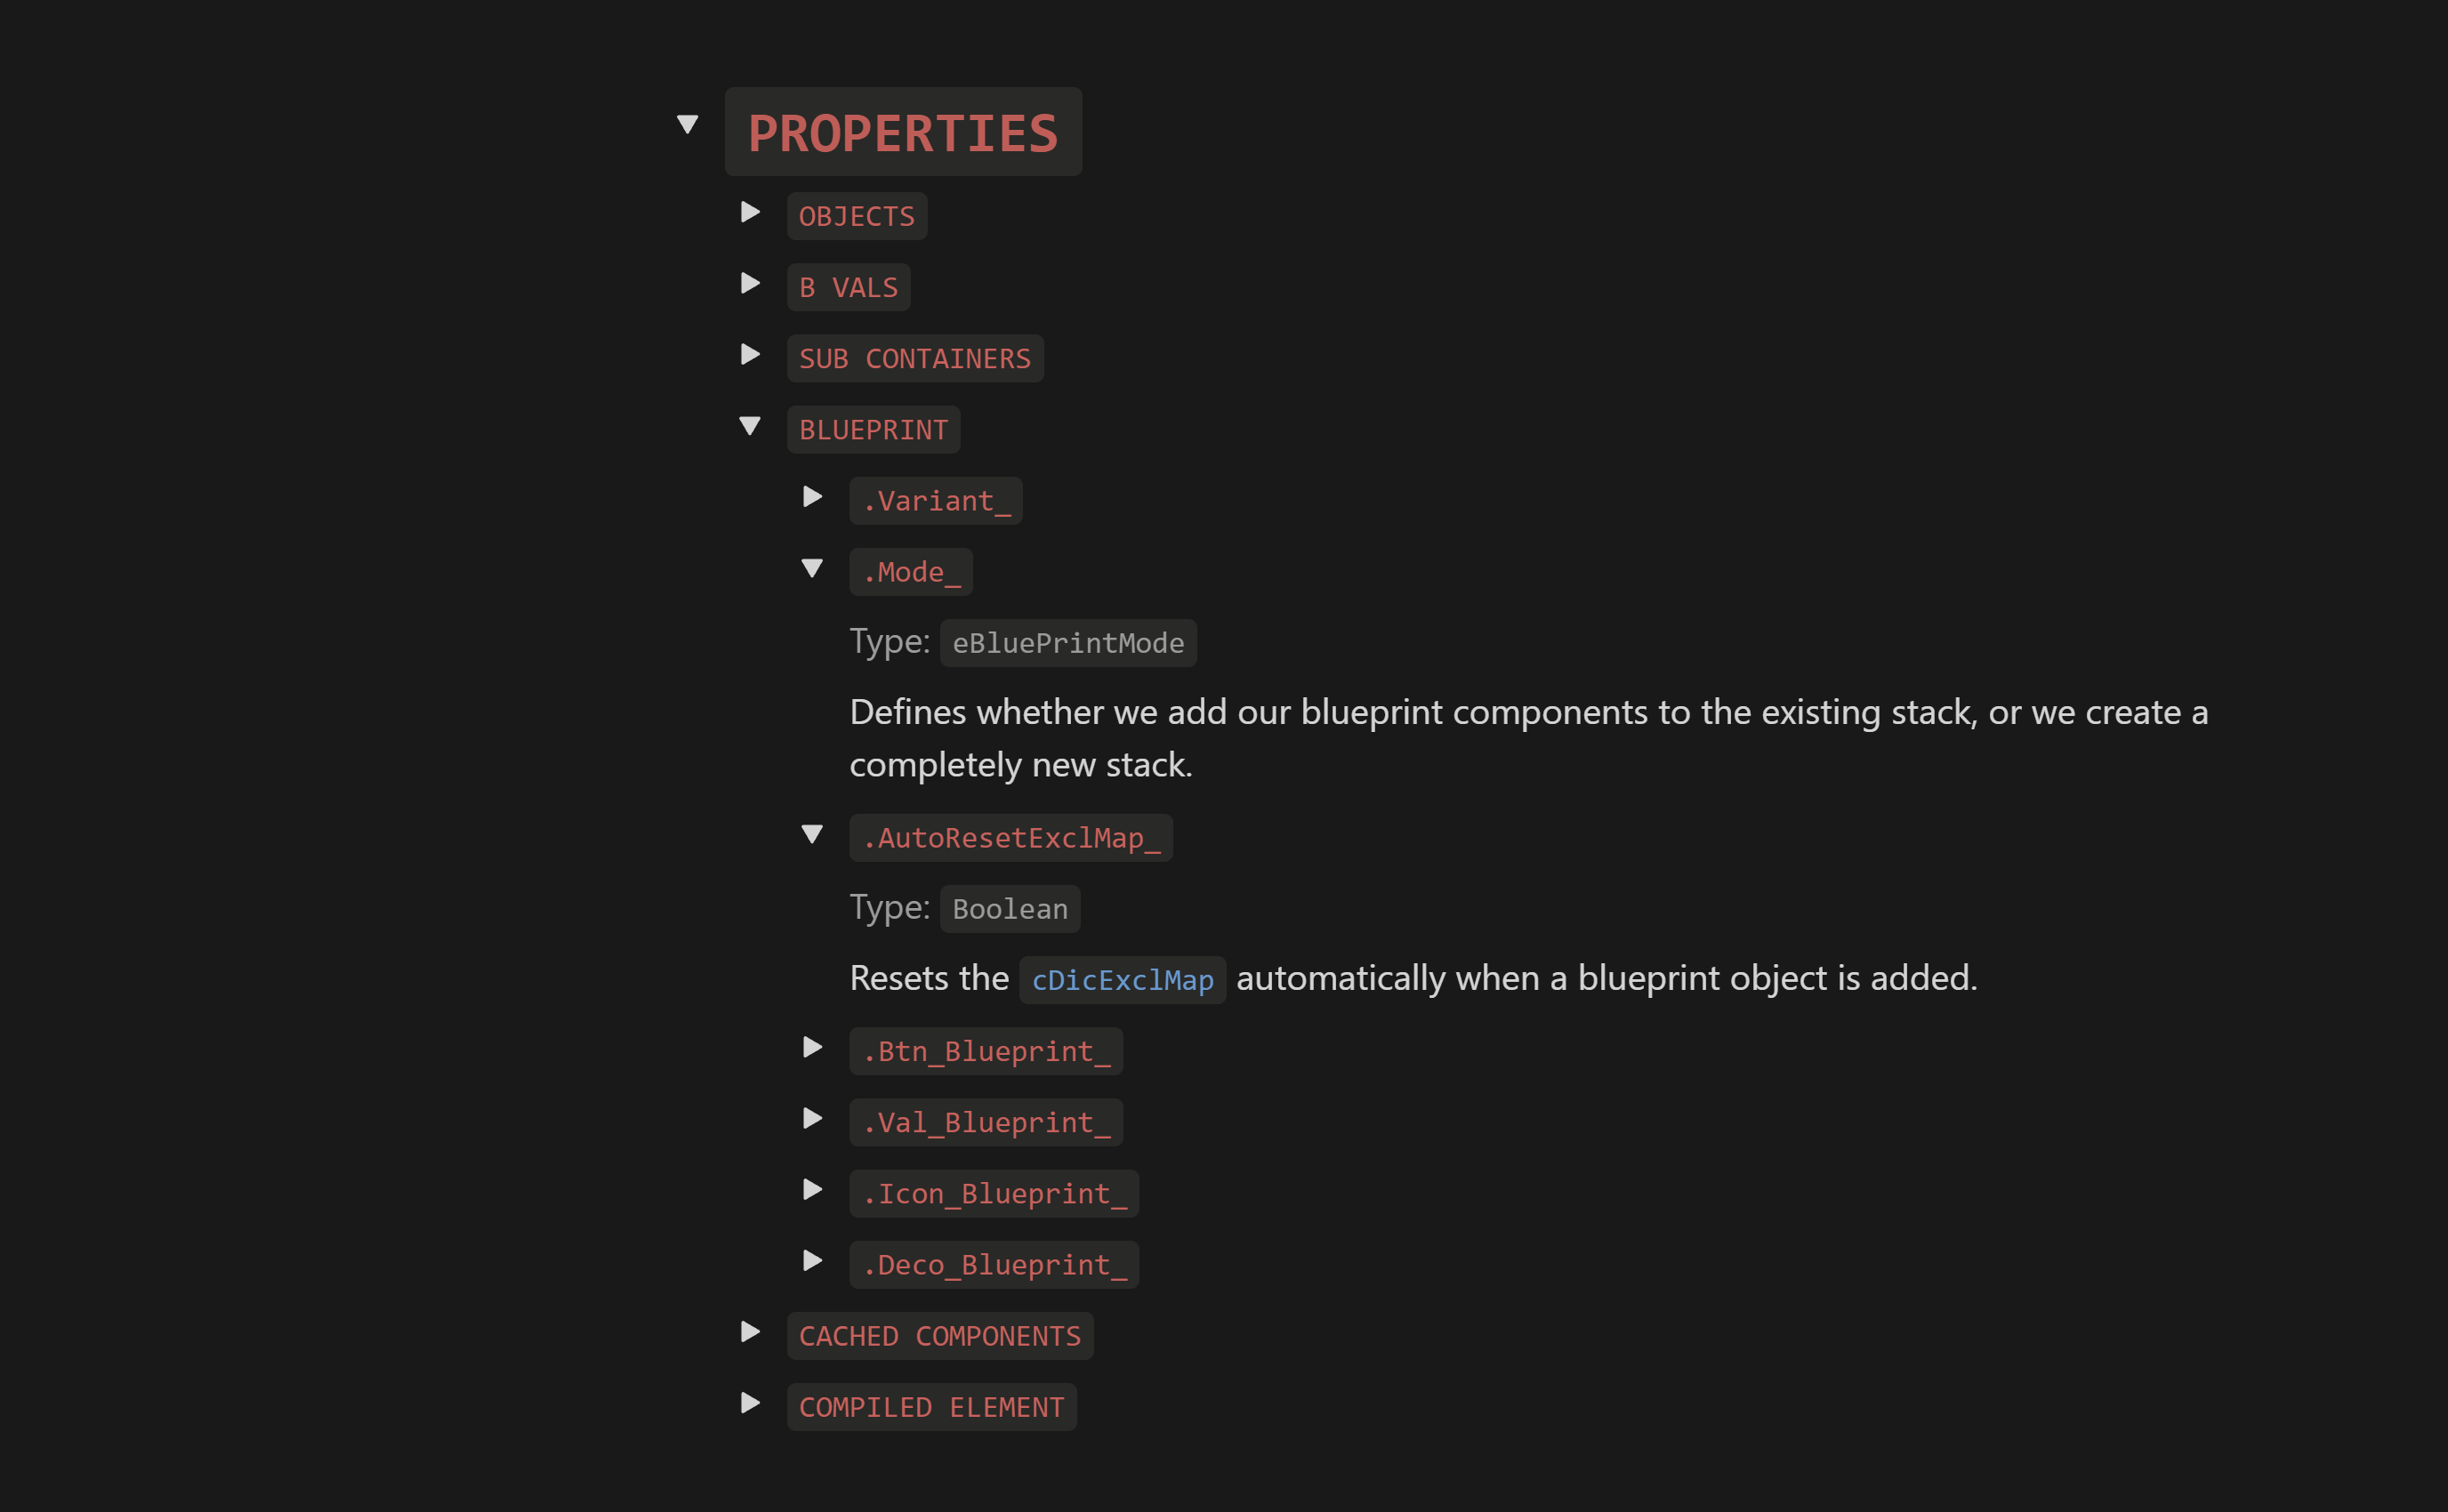
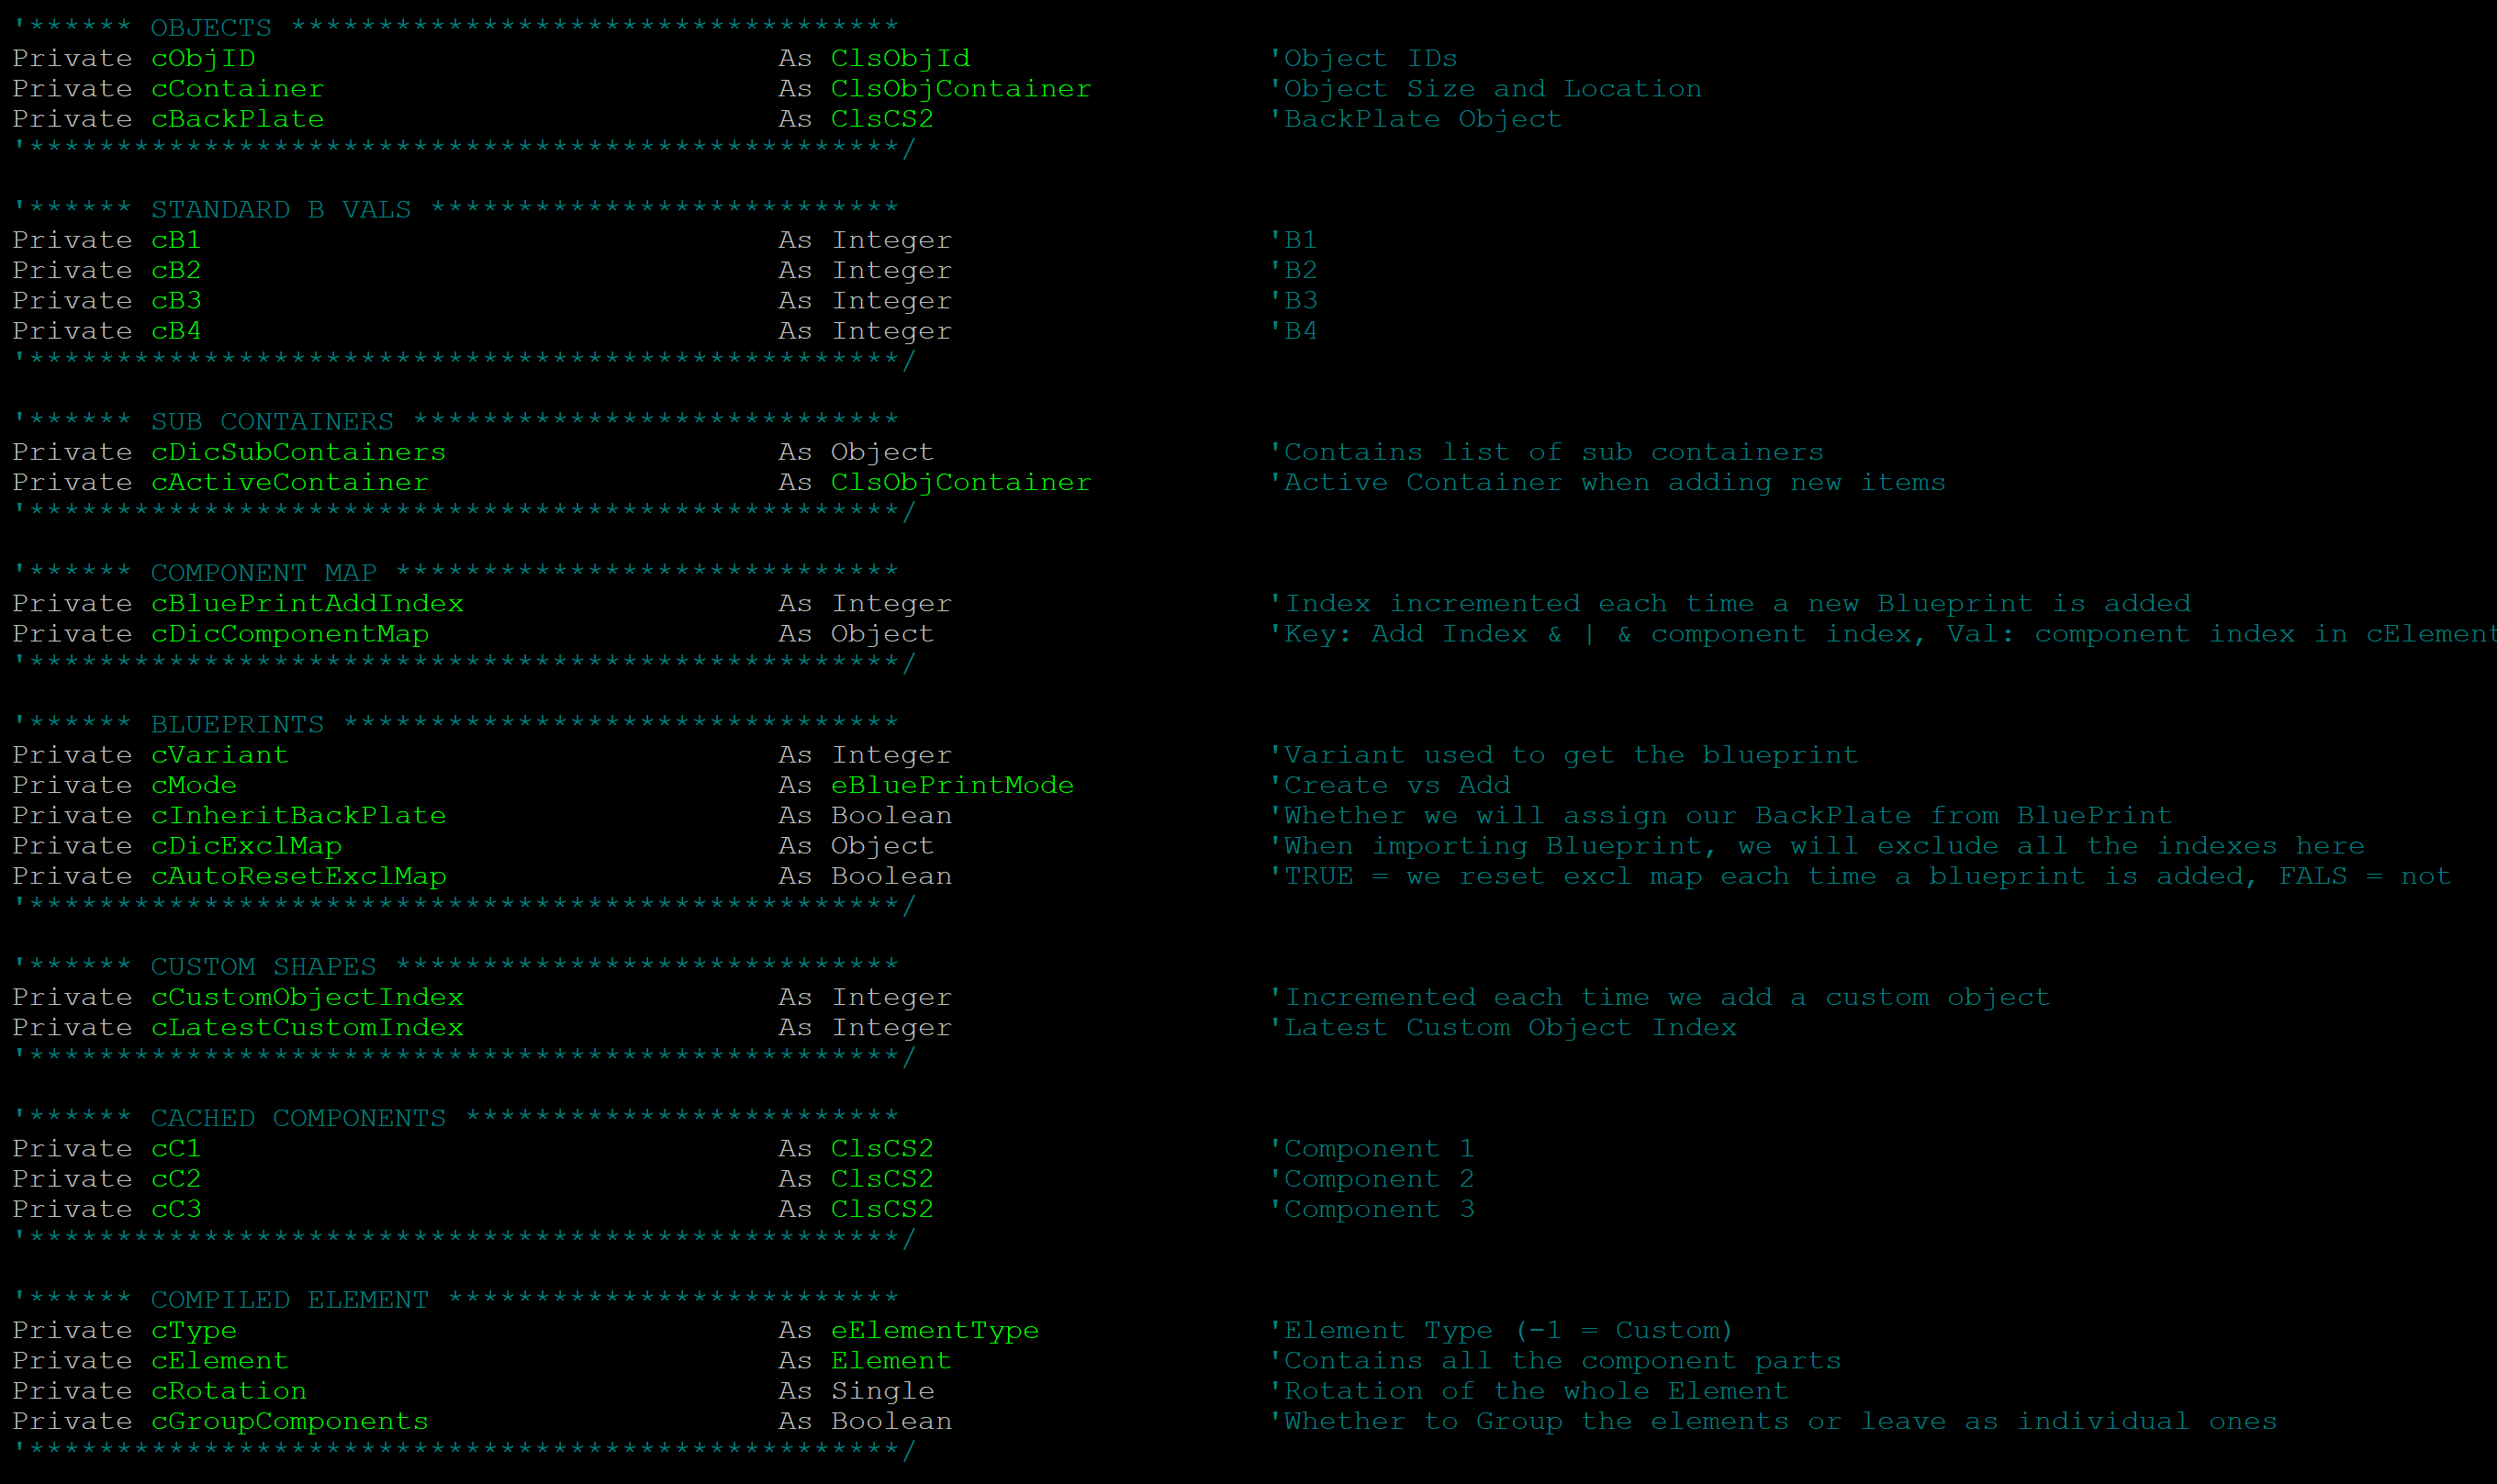
Properties
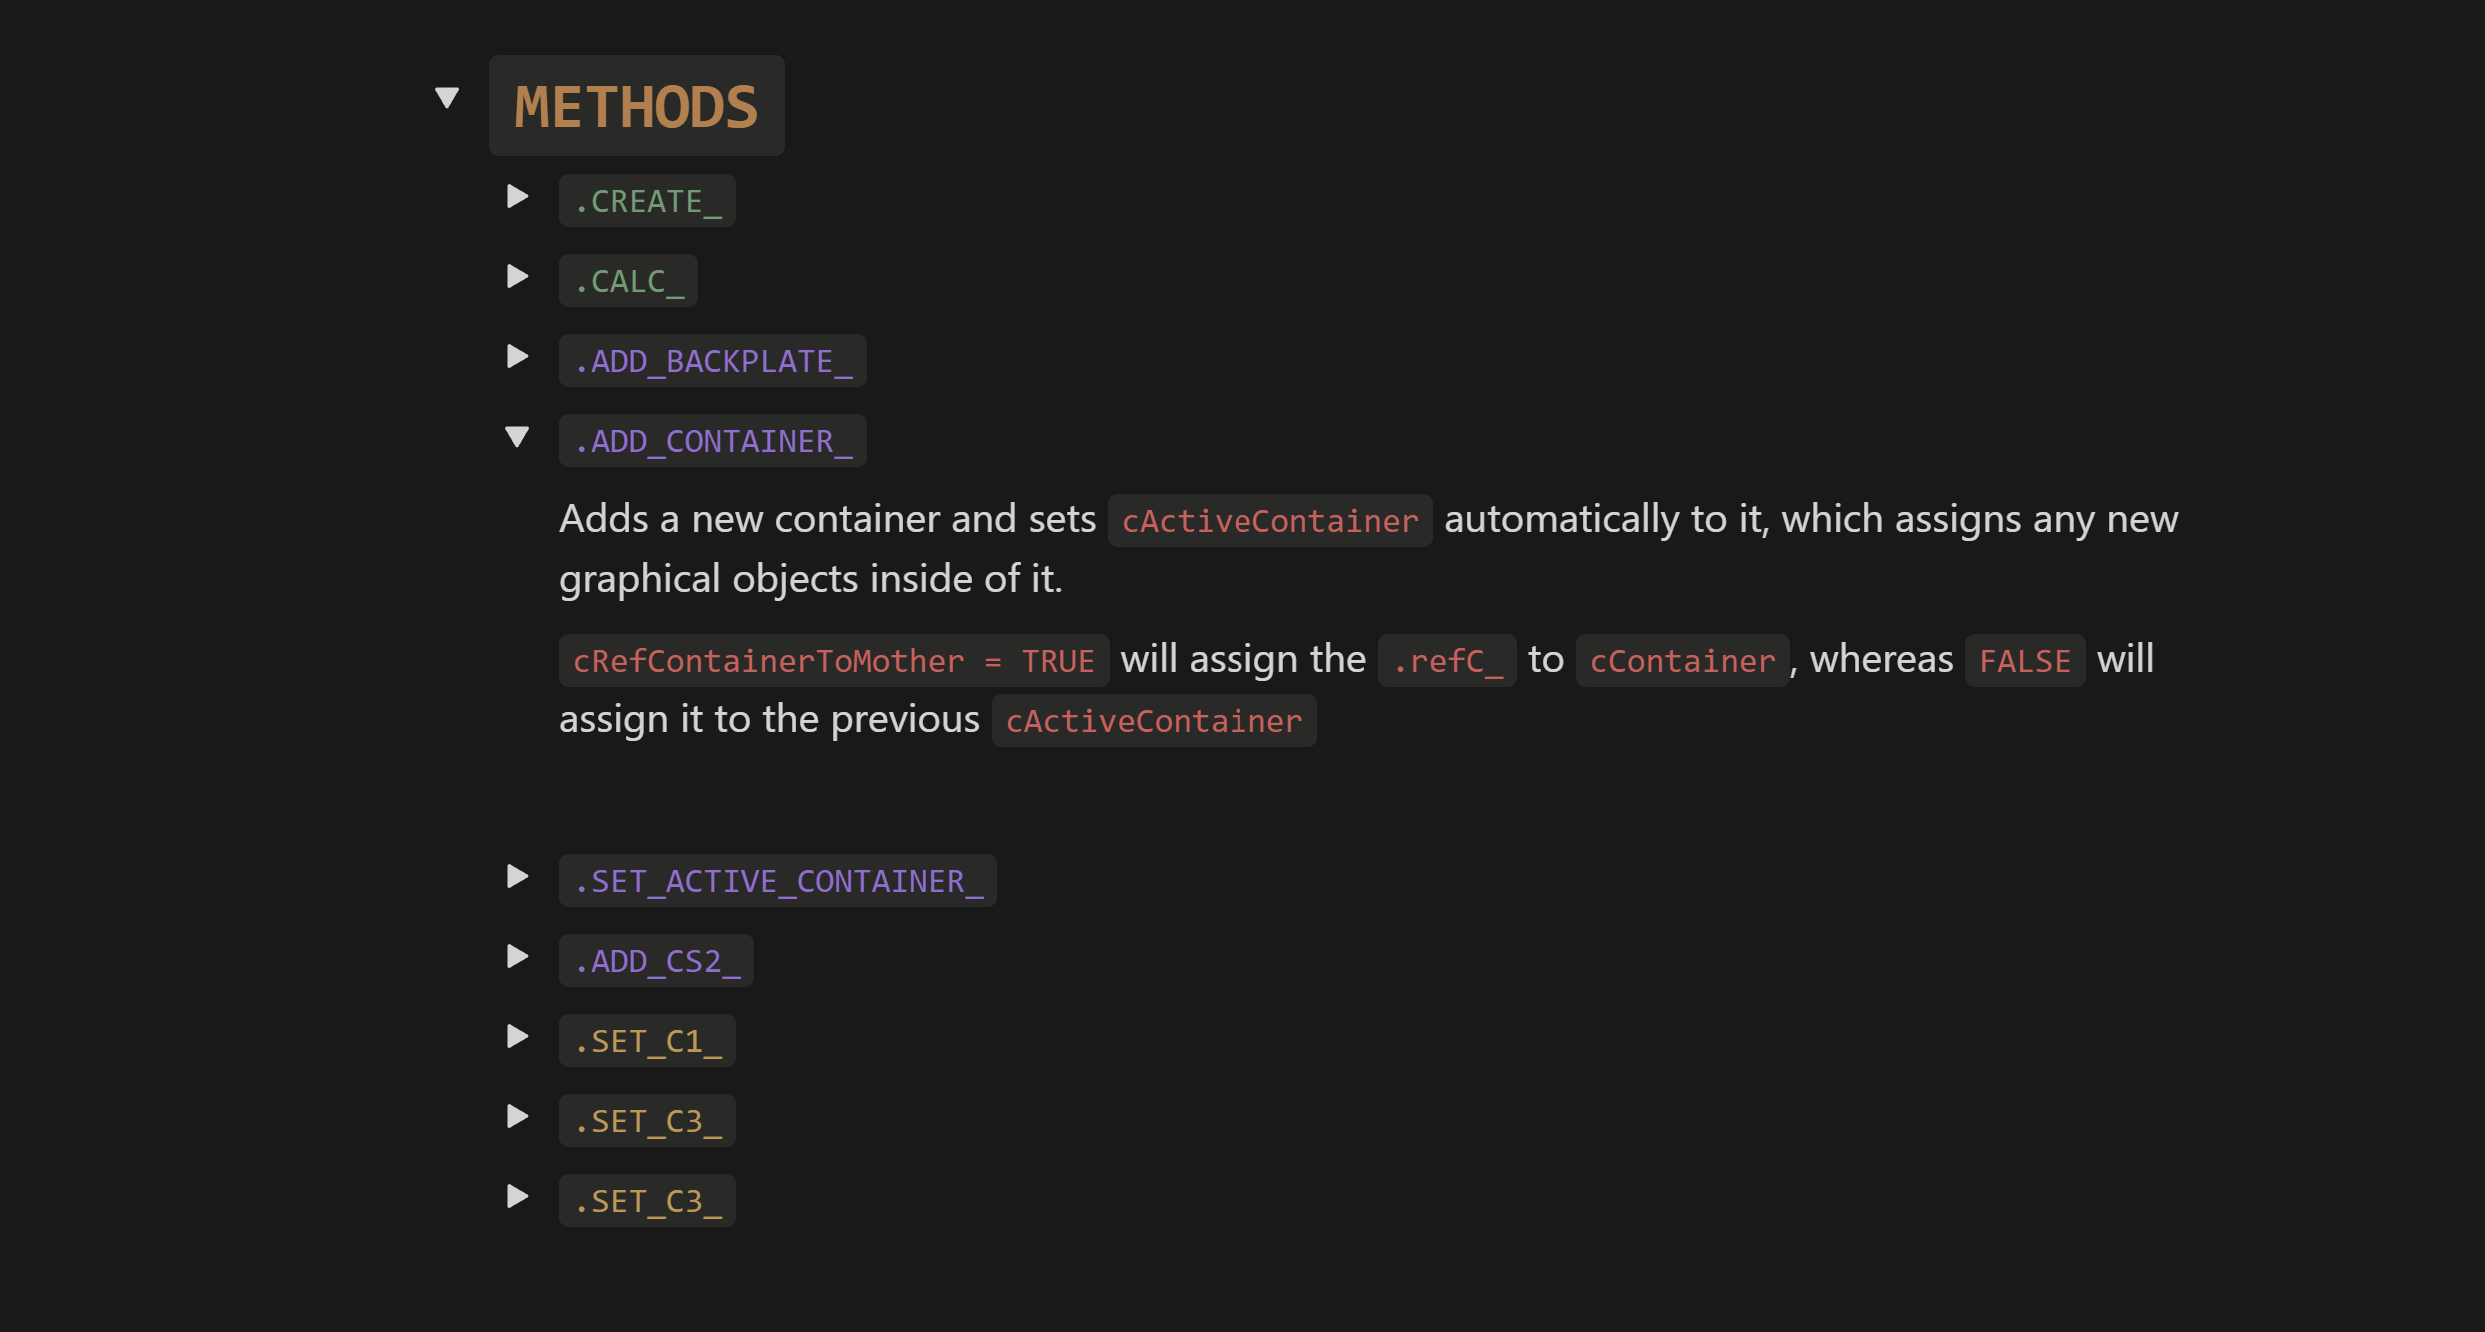
Methods
Closing Thoughts
Writing documentation isn’t just about keeping notes—it’s about ensuring long-term maintainability. Without it, even the cleanest code can become a nightmare to revisit. Over time, I’ve refined my process to strike the right balance: enough documentation to provide clarity without drowning in unnecessary details.
By structuring my documentation in Notion, breaking down each Module into clear sections, and writing most of the documentation before coding, I’ve created a system that keeps my project organized, scalable, and easier to expand.
While this approach might not be for everyone, I’ve found it invaluable for managing a project as complex as ACED BI. Whether you’re working solo or in a team, having a structured documentation process will save you time, frustration, and headaches down the line.